
Practice Project: Checkpoint 2
Adding more models and configurations to our project, and familiarising ourselves with artifacts and node selectors.
Part of the “Mastering dbt” series. Access to the full Study Guide. Let’s connect on LinkedIn!

After reviewing documentation for the dbt_project.yml file, deep-diving into Sources and Models, and understanding how events get logged, it’s time to apply everything we learned to our Practice Project.
In the previous Checkpoint, we introduced the dataset and started adding our first staging models with basic configurations. We are now adding more models to our project, based on a business case, and incorporating more advanced configurations and properties. Finally, we are checking out artifacts and playing around with commands and logs.
In case you haven’t already, you can download the dataset or refer to Checkpoint 1 to build your own fake dataset.
Table of contents:
Adding more meat to our project
In this step, we are going to add more models to our project according to the business case below. Remember to follow a branching strategy when adding these models. We are going to stick to Direct Promotion here.
The business case
Let’s expand our business case so we have a guide as to which models might need to be created.
We are working for a company that supplies products that range from Refined Chips to Awesome Computer (we are eclectic like that!). We are a B2B business, which means our clients are other companies whose employees can register in our system and place orders.
We have to create tables that will feed into reports created by a visualisation tool for 4 departments to answer the following business questions:
Sales / Revenue: responsible for driving more revenue by spotting high-value clients and products.
Which companies generate the most revenue?
Which clients are showing increased/decreased spend over time?
Do companies with more employees also spend more?
Are high-priced items driving fewer but higher-value sales?
Customer Success: ensure clients fully use their accounts and reduce churn.
Which companies are actively placing orders vs. being dormant?
How long from signup → first order?
Which new clients haven’t placed any orders?
Which companies have many employees registered but only a few active order placers?
Do employee demographics correlate with order activity? (any areas not being serviced, etc)
Operations: understand demand for products and plan production.
What’s the demand per product category over time?
Which products are trending upward in sales?
Are there seasonal peaks in demand?
User Support: support client employees directly, leveraging demographics and contact data.
Which employees are the most active buyers within a company?
What’s the contact information of employees driving the most revenue (for proactive support)?
Models to be created
Task: Add further layers to satisfy the business needs above.
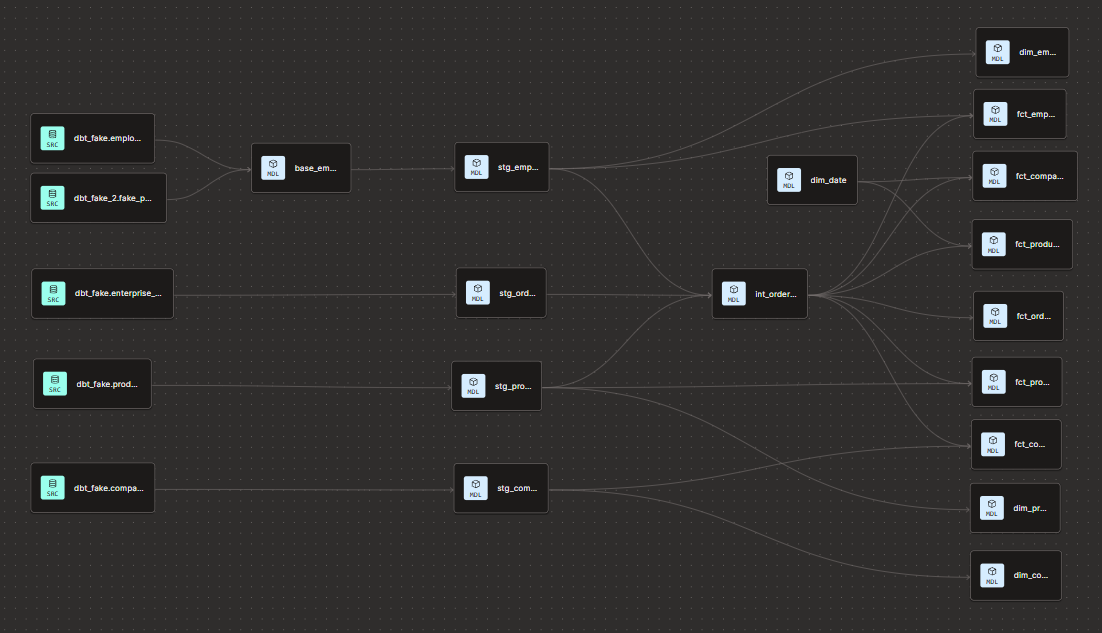
In the previous Checkpoint, we had added the staging models. Now, we are going to complete the DAG all the way to the marts. If you need to review the logic behind layering, we covered project structure in the previous Checkpoint.
I will share what I did, but, of course, you are free to create your models as you wish. Please note, I added the dbt utils package to take care of some of the transformations.
My folder structure and a description of each model are below. You can also see the models in my repo.
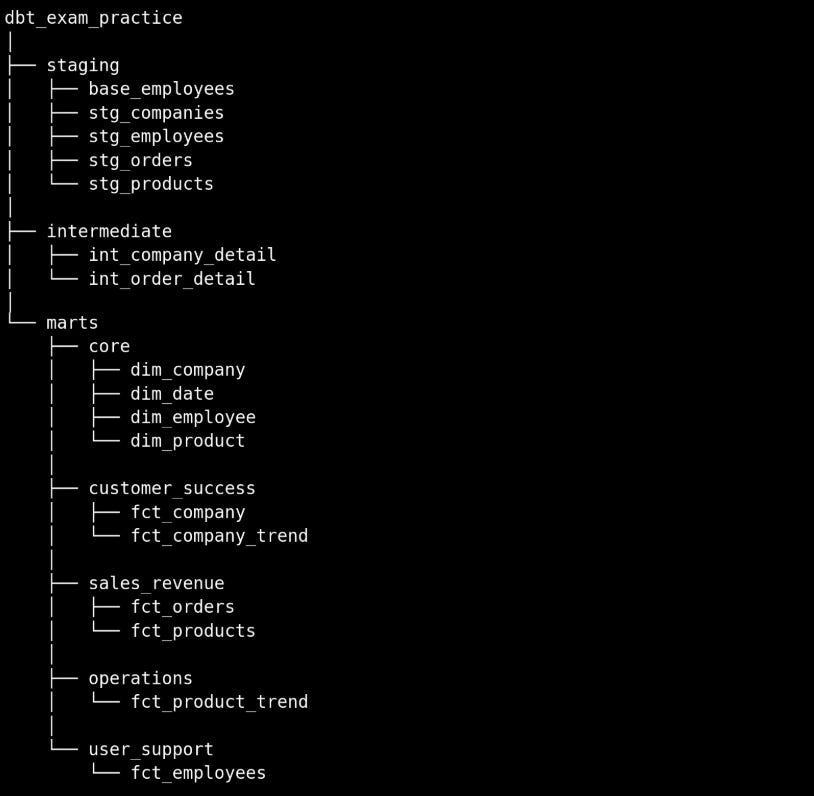
Staging: these had already been created in Checkpoint 1, but I made some additional changes.
base_employees: joins the two sources with employee data.
stg_companies: renames columns and removes null company_ids from the source data
stg_employees: renames columns; creates a new column (full_name); codes gender to be F or M; calculates the age based on birthdate; extracts fields from address into separate columns.
stg_orders: adds a surrogate key using the dbt utils package based on date and employee_id, assuming each employee could only place one order per day; renames columns.
stg_products: renames columns and removes null prod_ids from the source data
Intermediate:
int_order_detail: adds company and product information to the orders table; adds an order_value column.
Marts:
Core: these are dimension models that can be used by multiple departments
dim_company: pulls company data and adds tenure based on date_added.
dim_date: a date spine built using the dbt utils package.
dim_employee: pulls employee data and adds tenure based on date_added.
dim_products: pulls product data and adds tenure based on date_added.
Customer_success:
fct_company_trend: comp_id and order_date grain with number of orders, items, employees ordering, order_value, and some columns brought in from the date_spine.
fct_company: creates aggregations by company like latest_order_date, first_order_date, num_orders, max_order_value, min_order_value, avg_order_value, max_order_basket, min_order_basket, and prod_most_ordered; adds a status column based on frequency of ordering.
Operations:
fct_product_trend: prod_id and order_date grain with number of orders, items, companies, order_value, and some date spine columns.
Sales / Revenue:
fct_orders: this is just a select from the int_order_detail model. We repeat it here because the int model is being referenced by other marts models and, according to the best practices, marts shouldn’t refer to marts. It’s an extra model, but it helps keep things organised.
fct_products: creates aggregations by product like latest_order_date, first_order_date, num_orders, max_order_value, min_order_value, avg_order_value, max_order_basket, min_order_basket, and prod_most_ordered; adds a status column based on frequency of ordering.
User_support:
fct_employees: creates aggregations by employee like latest_order_date, first_order_date, num_orders, max_order_value, min_order_value, avg_order_value, max_order_basket, min_order_basket, and prod_most_ordered; adds a status column based on frequency of ordering.
Defining materialisations
Task: Now that we have reviewed the 3 basic materialisation types, we are going to spice things up. So far, we have set everything up as Views.
Configure marts models to Tables in the dbt_project.yml file. However, since dim_date is just a lightweight date_spine, set this particular marts model as a view.
Configure the “base_employees” model as Ephemeral using a config block in the model itself. As only “stg_employees” references this model and the transformation it performs is quite simple (while we are dealing with static data), we don’t need it as an object in the warehouse. Notice how the compiled code behaves in the “stg_employees” model that references it.
You can also test adding a different materialisation to “base_employees” in the dbt_project.yml file and notice how the hierarchy is applied. The config block in the model will take precedence regardless of the config in dbt_project.yml.
Setting up and testing more advanced configs
Task: now that we have reviewed more advanced properties and configs, let’s enhance our dbt_project.yml, sources.yml, and properties.yml files.
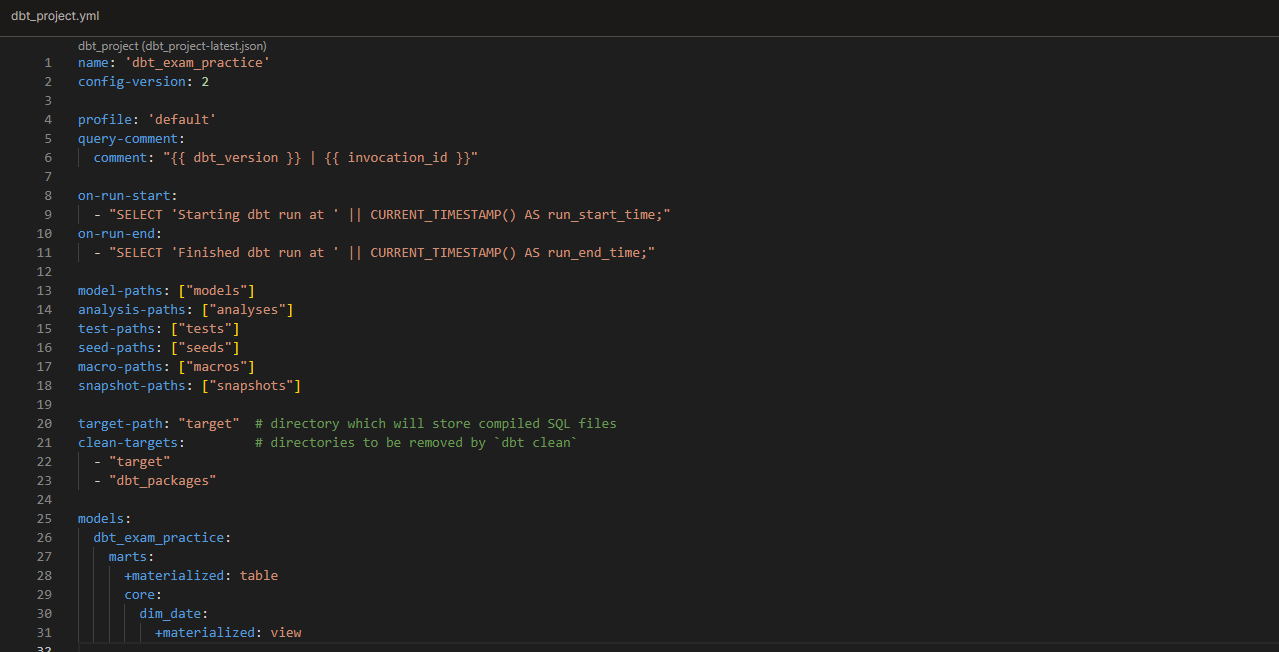
Configs: name, query-comment, on-run-start, on-run-end (for the last 3, notice where the inserted queries show up)
Test changing paths in dbt_project.yml
Test clean-targets
Property: name, description, database, schema, tables.
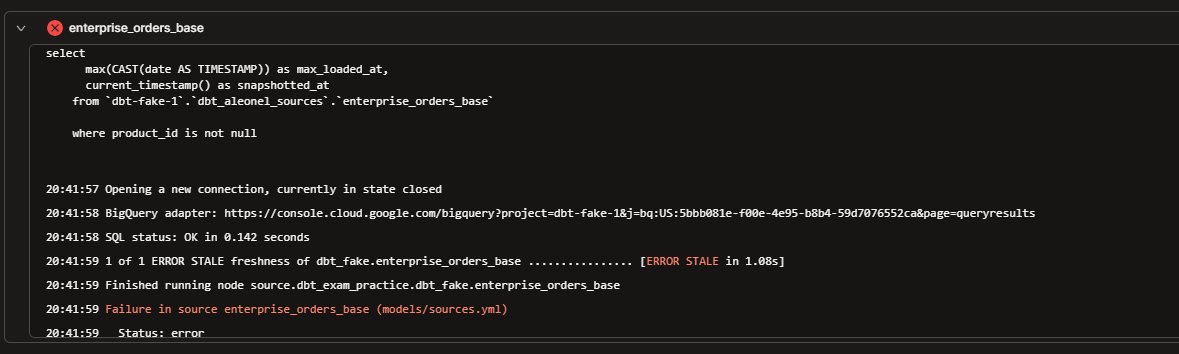
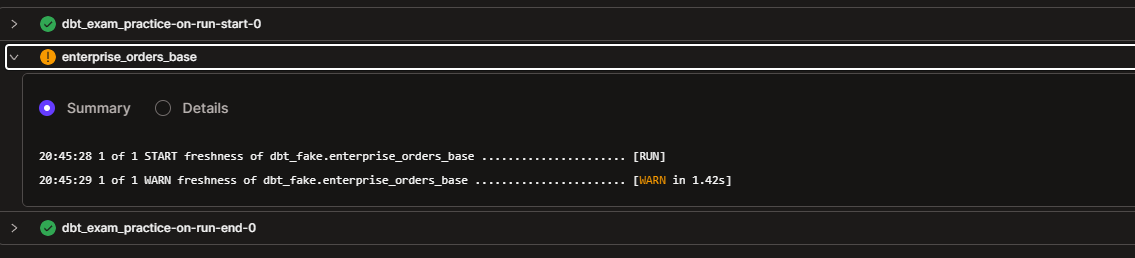
Configs: meta, freshness: declare it and test the source freshness command. Change the warn_after/error_after so you get stale and fresh results for practice. In my case, I set up freshness for the enterprise_orders_base source and tested it using the “dbt source freshness -s "source:dbt_fake.enterprise_orders_base"“ command.

Model-specific properties and configs
In a properties.yml file: name, description, deprecation_date (test - I couldn’t get the warning to show). I’m using the codegen package to generate the yml for all models.
In dbt_project.yml, add the configs: materialized, sql_header (test), tags, groups, schema & alias, persist_docs, full-refresh (test), meta, access
Node selection and command test
Node selection test: Play with select and exclude, graph operators, @ operator, unions, intersections, empty flag
Test 4 key commands and check the logs
Commit the changes and check artifacts
PR and merge
Familiarise yourself with artifacts, including dbt.log, manifest.json